Feeds:
Posts
Comments

Archive for the ‘Steampunk’ Category

Now that the Eastern Approaches exhibition is over a new exhibition has taken its place at the St Albans museum, and again I’ve got some of my work in it.

Called ‘Gadgets & Goggles‘ this is steampunk-themed show, mainly featuring the amazing collection of historical artifacts that has been put together over the years by Maurice Collins (which have been featured a lot over previous years on the tv, in books, etc)

The exhibition is free to visit and is on display until 13th April – check out the official museum page here for more details:

 http://stalbansmuseums.org.uk/Exhibitions/Gadgets-and-Goggles2

Here are some quick shots of my stuff (all taken at night at the private view so not the greatest quality I am afraid) but do get along to see the how if you can!

Three of my smaller pieces

Three of my smaller pieces

The large 'Tripus' lamp

The large ‘Tripus’ lamp

Detail from 'The Swamm Neck' lamp

Detail from ‘The Swamm Neck’ lamp

Gadgets and Goggles flyer

Gadgets and Goggles flyer

Read Full Post »

Things have been very busy here over the last few months on the design /making front (despite the criminal lack of write ups about it!).

In particular, my range of hand-made / bespoke lamps (many in a steampunk style, but all made in my usual style of using found and recycled items) have been proliferating and reaching some new audiences.

I’m currently working on a dedicated on-line display for them (complete with proper photography – the ones below are just some quick snaps which don’t do them justice, I am afraid, but in the meantime, for your amazement and delectation, here are three of my latest and finest.

Please note that all of these items are for sale – most have fittings that allow commercially available bulbs (normally low voltage 20W halogens of the kind readily found in IKEA etc) to be used. All come with UK mains to low voltage transformers, but can also be use with other low voltage power supplies for use with halogens in other countries…

…perfect Christmans gifts for your light-loving friends and relatives!

Each have  different price tag and would require specific postage and packing adding (depending on where you live and the size and weight of each lamp) – please contact me for any and all queries (I’ve not included sizes here so plead ask for a full list if these), a no-obligation chat or to discuss having a bespoke item made for a particular gift or use.

The Mantis

The Mantis

The Mantis

Mantis - alternative view

Mantis – alternative view

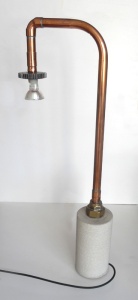
This is my latest creation!  A cast concrete base holds a nicely curved brass tube upright, which eventually joins a copper pipe lamp holder. Two UK 2p coins cap off the head of The Mantis. This is also my first lamp where the cable is visible / an integral part of the design – brass eyelets funnel the cable from the fitting down and away from the base.

Shown here with a small 20W halogen, it can be use with a larger 20W halogen bulb if desired.

The Can-Olivas Downlighter (or uplighter if you want to turn it the other way?)

I love this piece!… A rusted iron bracket and tube becomes a copper pipe and brass fitting lamp holder. This looks great on either a very plain, modern wall, or works equally well from a dark coloured, rustic setting. The lamp attaches to the wall by four screws – the wire needs to be chased into the wall or fed into a guiding hole through.

The Can Olivas

The Can-Olivas

The Can-Olivas alternative view

The Can-Olivas alternative view

This piece was inspired by the interior design style of a villa I recently stayed in – the name is a tribute to the location.

The Moolah lamp
The Moolah

The Moolah

Lucre Lamp alternative view

Lucre Lamp alternative view

Built from a stoneware base (once an old liquid soap holder!), an elegant copper tube and set of elbow joins end in a heavy steel cog lamp holder. The lamp looks great with a small, 20W bulb, or equally at home with a larger ad brighter 20W version.


Read Full Post »

Copper, brass and stone tap

Copper, brass and stone tap

Here are  few quick shots of some very clever and lovely, yet extremely rustic, uses of old copper pipe and brass taps… within what proved to be very up market and luxurious surroundings!!

Despite being used to great effect (in a very stylistically designed interior of a luxury holiday villa) all these items look like they have been built from bits and pieces found in my local skip… manna from heaven!! I spent a lot of time fiddling with them for their form and design – sometimes I even had a wash with them!

I am sure they cost a lot of money to source, import and install, but I think they give hope and inspiration to all us ‘found item’ designers and makers out there!

Brass bath tap

Brass bath tap

Another view of the full bathroom sink

Another view of the full bathroom sink

Read Full Post »

I’ve just been working on a new commission for one of my copper lamps. It’s going really well, but the structure of it is pretty complex and I’m finding the process of wiring it up particularly troublesome.

I’ve made life even more difficult for myself  (mainly because I want the piece to have real impact) by including a few ‘hidden extras’ within the piece (all of which will be revealed in the final photos!), each of which require an additional strand of wiring.

This means that the total piece requires three strands of dual core, low voltage wiring to be run through the entire length of the piece. The photo below (sorry it’s a bit fuzzy!) shows some of the intricate features and tight bends that the cables have to be fed both through and around.

complex bends

complex bends

To make this process even more difficult, the lamp is made entirely of 16mm copper pipe and associated fittings, so is pretty narrow at the best of times. Factor-in the internal ridges of the various soldered couplings, and the fact that the tubing is recycled so has a dirty, corroded and lime-scaled inner surface, and the whole job seems pretty-near impossible at times.

My normal process is to feed a piece of very strong, yet very thin, nylon string through the pre-soldered lamp, tie this string firmly to the cable (or in this case three sep cables tied together) and feed this through the tubing by a combination of pulling on the string whilst simultaneously pushing the cable from the other end.

With the current piece, even just getting the string fed down the entire length of the piece proved tricky! I realised that what I needed was a small yet heavy weight, neither too long or too wide so that it wouldn’t feed itself round the hard turns of the various joints (I normally tie a small nut to the end of the string to act as this weight, but this simply wasn’t up to the job in this instance).

I thought of going to a fishing tackle shop to see if they sold small lead weights but, as always, preferred the idea of trying to make my own.

Hence, I came up with the following simple, yet surprisingly effective process.

Firstly I took a block of plaster (cast from hard setting moulding plaster poured into the bottom of an old plastic bottle) and drilled some deep holes, of varying diameters (to give me options of size and weight) in to this.

I then melted a small amount of lead in an old ladle, and poured this into the holes in the plaster. When cooled, I simply broke the plaster away, leaving the smooth rods of lead exposed.

They required very little cleaning up – all I did was drill a very small hole directly though the end of each of them to allow a string to be tied onto the weight.

Here’s an image of the tools and results…

(L–R) lead & ladle, plaster block with holes, finished weights

(L–R) lead & ladle, plaster block with holes, finished weights

They worked really well in practice. The lead is heavy enough to drag the string down the tubing, and I found I could easily cut the weights with just a pair of pliers to make them shorter if need be to help negotiate the really tight curves.

The lamp is now wired up and ready for the next step – I’ll post up details a soon as it’s completely finished…

Read Full Post »

Steampunk on Radio 4

Toady there was a short programme on Radio 4 (my favourite radio station!) on the steampunk genre.

Do have a listen here on the iPlayer if you get a chance (for 7 days, I think) – it had a few interesting snippets on there. . .

Steampunk on BBC-Radio-4

Steampunk on BBC-Radio-4

(needless to say I didn’t get a mention – hey ho!)

Read Full Post »

Here’s a little something I found in my local charity shop for £3 UK! Considering my obsession with things old and brassy, I simply couldn’t resist it!

Ding !

Ding !

It was a bit tarnished so I cleaned it up with some wire wool and Brasso – I don’t think I ruined any great ancient patina as I am sure it’s not that old a piece, and to be honest it just looked grubby close up rather than attractively aged!

It does have a lovely ring however, and the sustain goes on for ever. I think it will make an appearance on a tune very soon!

Read Full Post »

Some time back I lost one of the knurled knobs from my trusty old Ibanez electric guitar…. having failed to find a replacement anywhere, I though I’d have a go at making a new one from copper and brass – it wouldn’t look the same of course but would hopefully echo the brassy look of the rest of the fittings on the guitar, and also complement some of the other stuff I have made in and around my music equipment (like my copper guitar hanger, etc).

So, here are a series of photos showing what I did and how. . .

Firstly, here’s  shot of one of the original knurled knobs (spot the green corrosion in the knurling – horrid!):

original knob

original knob

. . . and here is the one I made by soldering a short length of copper pipe fitting onto an old 10 franc brass coin (the fitting has been cut down a bit to make it fit the height of the existing knob a bit better…). This shot shows it after just a light clean up – I polished the final thing a lot more with wire wool and Brasso before giving it a light coat of spay clear varnish)

new knob

new knob

To attach the new knob to the stem of the potentiometer, I cut a short length of inner sleeve from plastic tubing about the right diameter to act as a push fit over the pot stem, and fixed this in centre place within the body of the knob with some hard setting casting plaster (epoxy would have done just as well I guess):

inner sleeve

inner sleeve

Here it is in place (note the air bubble in the plaster – oops!). I filed any proud plaster/plastic sleeve flush with the bottom of the copper knob, and slightly chamfered the top of the inner sleeve to have a bit of clearance over the fixing nut of the potentiometer:

sleeve plastered in place

sleeve plastered in place

Here is a shot of the finished knob in place on the guitar – they look very different but somehow complement each other I think? (apologies for the rather blurry photo!):

knob in place

knob in place

One thing I’ve never been that happy with on my guitar is how close the volume knob is to the bridge of the guitar (in the above photo, this is the distance between the upper knurled knob and the brassy bridge/black pick up). I therefore wondered if, having done all this work, it was now the time to bite the bullet and try moving it…  I had a spare 10 franc coin left over, and through that this might make a nie ‘blank’ to fill in the hole that would be left by removing/moving the original volume knob.

Below is a shot of me marking out a new position for the volume knob, roughly half way between the lower tone knob and the original hole…

marking out

marking out new hole position

Here’s me drilling the new hole – the white dust is the hard lacquer rather than the actual wood:

drilling the new hole

drilling the new hole

To fill in the original hole, I superglued the 10 franc coin in place over it (just to act as a temporary guide) and scored around the rim with a scalpel to mark the position and prevent the lacquer from cracking when routed out. Then using a small routing bit with my trusty Dremel tool, I proceeded to rout out a hole of the right depth and diameter to accommodate the coin. After a  few tries, it was just about right – the shot below shows this work in progress, as well as the volume pot screwed in place in it’s new location (minus knob) .

routing the recess

routing the recess

I stained the outer edge of the hole with a black marker (just to help hide any irregularities) and, having polished and varnished the coin, glued it in place with a bit of epoxy resin glue and here it is!!:

everything in place!

everything in place!

Here’s another shot of the final thing:

the finished item

the finished item

It’s not perfect, but is now much easier to play, and always gets some interested comments when people see it. Having lived with it for a while I think I will certainly make another new knob to replace the old knurled one – they work ok together visually but would be much nicer as a coordinated suite I think!

Read Full Post »

Here’s a couple of shots of my latest set of creations –  a series of keyrings or light pulls (depending on the size and weight of them) made in a copper/brass steampunk styling.

Below is a representative sample – I forgot to put anything in to show scale but the relative sized of the various components give one a clue…

Light pull / keyring

Light pull / keyring

shot of the bottom 'dome'

shot of the bottom 'dome'

Made as ever from found and recycled components, the core parts are my usual ‘staples’ of copper tube, old coins, keys and range of brass and iron ‘doodads’ for decoration etc (for example the brass domed rivet that fills the bottom of the version shown).  Mix in a liberal helping of ‘secret ingredient’ to hold all the parts firmly together and there you have it…

So far I have a made a large range of shapes, sizes and  styles – some like the above are polished and varnished, some will be left in a raw state to corrode/wheather as time sees fit…

Here is a rather poor, and indeed confusing, shot of several of the ‘work in progress’ ones I am making at the moment, as well as the rather rustic display pole I have been working on to both store and show them off.

Display pole and more samples

Display pole and more samples

My aim is to sell a bunch of these – if you are interested then get in touch and I’ll tell you what I was thinking in terms of cost, delivery etc…

Read Full Post »

Want to know something really spooky!!??

Last year (on this very day!) I posted the following about my new obsession with anemometers. I’ve not really spotted any others since and then, lo and behold (whilst walking to my car following a cuppa with a mate today), I spotted the following in the garden in a house in St Albans…

copper windvane and anemometer

copper windvane and anemometer

another shot

another shot

Not only is it a fab anemometer (attached to other weather monitoring equipment by the look of it?), but also a wonderful copper windvane (satisfying another love of mine, ie anything made from copper pipe and ball cocks!).

And I promise the coincidence in dates is exactly that – really, really strange!

Read Full Post »

Anyone who knows me (or who reads this blog) will know that finding discarded items – in skips, on the street, in charity shops (not sure it strictly counts if you have to buy them?), donations from kind friends etc – is a major part of my life! It’s a strange yet fascinating lifestyle – sometime you go weeks without finding anything good at all, others yo u can hardly move without tripping over some piece of discarded treasure!

This week has been one of those lucky times – and here are just s selection of things that have magically turned up!

1 Steampunk Light Switch

Look at this beauty!! A wonderful gift from my mate Bru (see number 3 below for more donations from this excellent chap!), he apparently found this in his daughter’s loft some years ago. I have no idea what to do with it at the moment – it needs a bit of a clean up (looking at the corrosion in the first picture I wonder whether to leave it as natural patina, or give it a bit of a polish? Decisions, decisions!) but I think would be great as part of a steampunk creation, or simply as-is as an ornament:

'Steampunk' Switch - notice the corrosion!

'Steampunk' Switch - notice the corrosion!

'Steampunk' Switch - iPhone for scale

'Steampunk' Switch - iPhone for scale

2 Old Desk Drawers

I have just found this (and another smaller one) in a skip – clearly some nice old drawers from some kind of desk. I really like the rusty metal handles, and the overall look, feel and scale are really pleasing also. I think a new carcass (possible with a modern painted finish to contrast nicely with the old-fashioned look to the drawers themselves) would work really well. The drawers are very long – I think I might need to cut them down to a reasonable size to stand any hope of fitting them into my tiny flat!

I will add this to my (growing rapidly by the day) list of things to do/make:

Desk drawer with handle

Desk drawer with handle

Very deep drawers!

Very deep drawers!

3. Plumbing Bits

Again from good old Bru, here are some plumping bits that instantly gave me some ideas.

The copper pipe looks nothing special at first glance (I find lots of this kind of stuff all the time) but it is a really strange diameter? Normal pipe is 10, 16 or 22mm, but this is something else – in the 12mm range. Never come across it before, but I have been looking for ages to make myself a new bedside light – this might be just the thing?:

12mm copper pipe find

12mm copper pipe find

Will give it a go and post up the results. . .

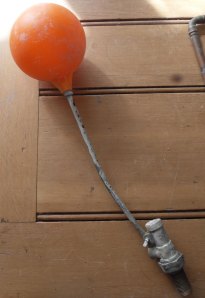
Finally, here is a ball cock plus arm – again a common find, but I really like the whole shape of this one. I have made several lanterns from plastic globes and ball cocks, and it is surprising what a fantastic glow effect they make with just a tea light popped in (try it yourself on a dark night and you will see what I mean). I already have a hanging ball cock light I use whilst camping (light, portable, fun!) – it struck me that with this recent find I could make one that stands up on some sort of pole, maybe adjustable in height? Again, am going to give this a quick go and will post up results:

Ball cock plus arm for making into a lantern

Ball cock plus arm for making into a lantern

Anyway, it strikes me that I have so many of these ‘finds’, that it might be worth me adding a new Category to the blog specifically for them – just to make it a bit easier to keep track of them all! Hope you enjoy. . .?

Read Full Post »

« Newer Posts - Older Posts »